
A technical SEO checklist is like a tune-up guide for your website.
Imagine your site as a car: Even if it looks shiny and stylish (thanks to great content and design), it won’t go far without a solid engine. That engine is technical SEO.
Now, the word “technical” might sound intimidating, but don’t worry. This guide is designed to keep things simple and beginner-friendly, even if you’re not a developer.
Whether you’re DIY-ing your SEO or working with a team, this Technical SEO checklist will help you spot and fix the most important technical issues that affect your rankings.
But first,
What is Technical SEO?
Technical SEO means optimizing the hidden parts of your site so search engines can easily crawl and index (discover and understand) your content. It helps with things like:
- Making sure your site loads fast
- Works well on mobile devices
- Uses clean, simple URLs
- Is safe and secure (HTTPS)
And has well-organized info (structured data = labels that help Google understand your content)
In short: If technical SEO isn’t right, your site may never show up on Google- no matter how great your content is.
Now that you know what technical SEO is and why it matters, let’s break it down into an actionable technical SEO checklist that you can actually follow, even if you’re not a techie.
Let’s go through each of these technical SEO checklist items in detail, with practical tips you can actually use.
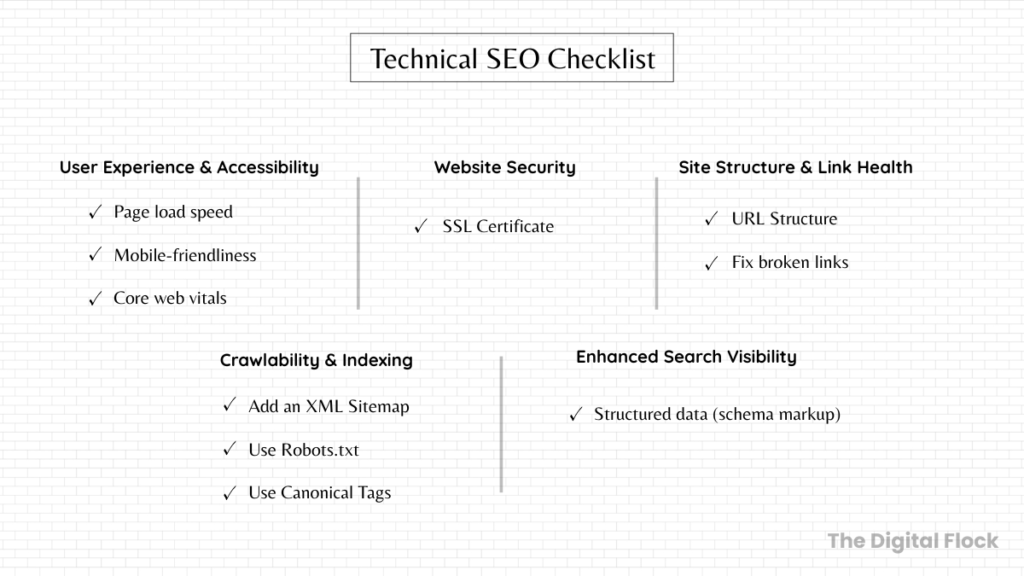
Google needs to clearly understand your content before it can display your site in search results. This checklist covers 10 essential technical SEO tasks, from crawling and mobile-friendliness to site security and structured data.
Technical SEO Checklist Broken Down: 10 Items Across 5 Focus Areas
I. User Experience (UX) & Accessibility
1. Improve Page load speed for Better SEO:
Ever tried to open a website that just wouldn’t load quickly? Chances are, you clicked away. Your visitors will do the same. A slow site leads to unhappy visitors resulting in losing traffic.
Google also prefers fast-loading pages, ideally, your site should load in under 2.5 seconds.
How to check your website speed:
Free tools like Google Page Speed Insights and GTmetrix can help you analyze your site’s speed performance. These tools analyze your website and highlight what’s causing slow load times, along with suggestions to fix them.
How to Speed Up Your Page Load Time?
- Shrink your images: Tools like TinyPNG and ImageOptim help you compress your images before uploading, so your site stays fast without losing image quality
- Remove extra code: Websites are built with code, but sometimes there’s clutter like unused styling or scripts that just slows things down.
Ask your developer to clean it up, or use plugins like Asset CleanUp or WP Rocket (great for WordPress users).
- Improve loading speed for returning users: When someone visits your website, their browser stores small parts of it, like the images, layout, and cookies on your site. This way, your site doesn’t have to reload everything from scratch the next time they visit. This is called caching.
Most caching plugins (like WP Super Cache, W3 Total Cache, or LiteSpeed Cache) let you turn this on with just a few clicks
- Make your website files smaller: Tools such as Gzip reduce the size of your site’s files, which speeds up page loading. Many hosting providers already support this, or you can turn it on using a plugin or by contacting your host.
Improving your page speed is one of the simplest wins in technical SEO. Keep it fast, and you’re already ahead.
2. Make your site mobile-friendly:
These days, more people browse the web on mobile devices than on desktops. If your site isn’t mobile-friendly, meaning it’s slow to load, hard to navigate, or poorly laid out on phones, visitors will likely leave quickly.
Plus, Google uses mobile-first indexing, which means it primarily looks at your mobile site when ranking you in search results.
How to Check if Your Website Works Well on Mobile
The simple way to check is to use Google PageSpeed Insights:
- Performance Score (Mobile):
Try to get a score of 90 or above- it means your site loads fast and works well on mobile. - Diagnostics Section:
This section provides detailed feedback. Pay attention to: - Avoid large layout shifts:
Fix elements that unexpectedly move while the page loads. - Reduce unused CSS/JavaScript:
Helps speed up your site by removing unnecessary code. - Avoid non-composited animations:
Makes scrolling smoother by reducing heavy animations. - Accessibility Section:
PageSpeed Insights also flags accessibility issues that affect usability, such as:
Text and background contrast
Tap target sizes
Use of alt text on images
Fixing these issues ensures your site works well for everyone, including people with disabilities, and can improve your SEO.
- Interactivity & Readability (Manual Check):
Can users tap your buttons easily without pressing nearby stuff by mistake?
Is the font size readable without zooming?
Can users scroll smoothly and comfortably without side-swiping or zooming in?
Always preview your site on multiple real mobile devices to make sure it looks and works well across screen sizes.
Quick Fix Tip: Use AI to Understand and fix PageSpeed Issues
If PageSpeed Insights flags problems like “Tap targets too small” or “Low text contrast,” and you’re not sure what they mean- don’t waste time Googling technical jargon. You can simply ask an AI tool like ChatGPT for help.
Here’s what I personally did:
- I copied the exact issue from PageSpeed Insights
- Pasted it into ChatGPT, and
- Asked something like (prompt):
“PageSpeed Insights gave me this result for my site: [paste issue]. I’m a beginner — can you explain what this means and how to fix it in plain, simple steps?”
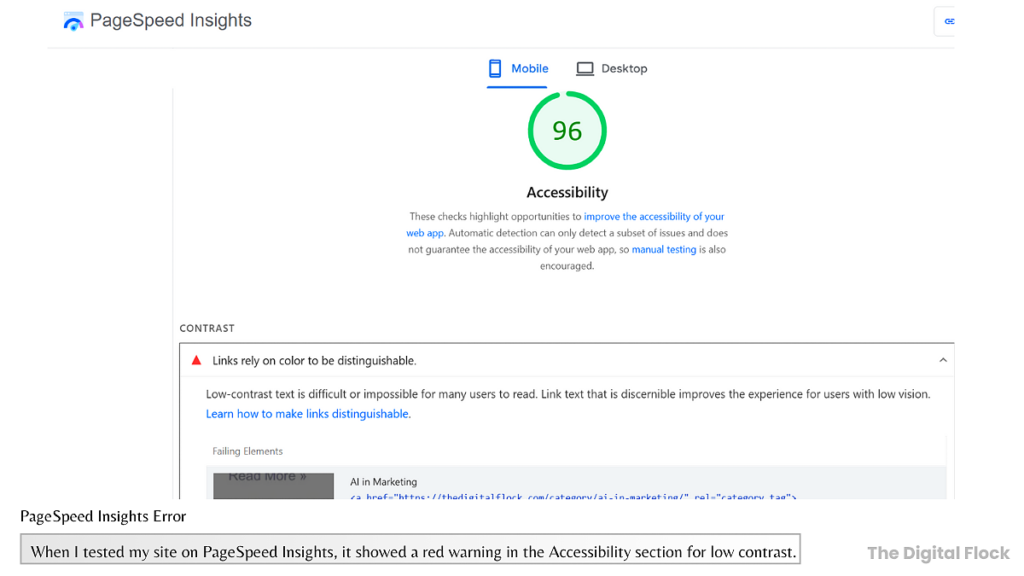
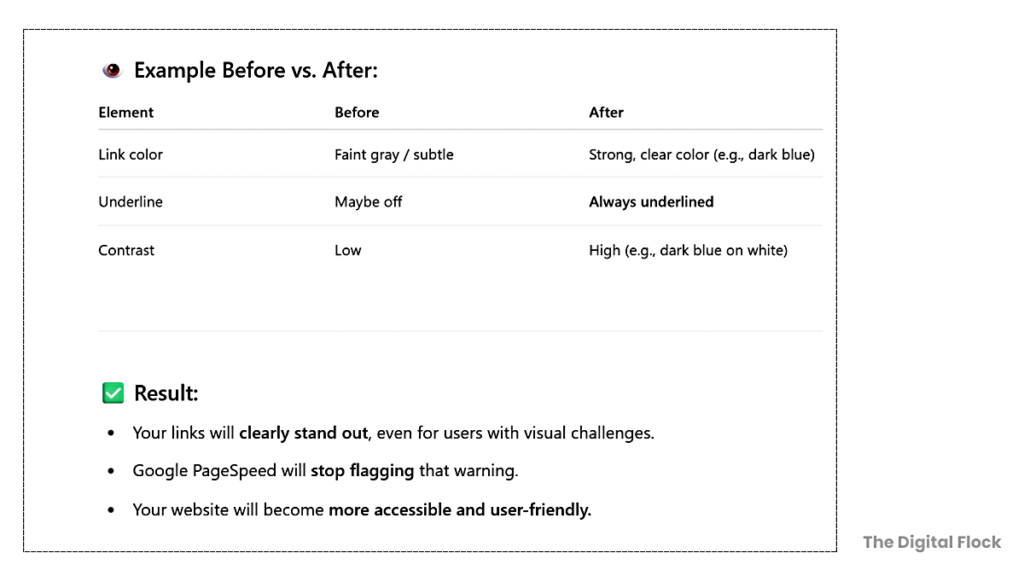
For example:
My PageSpeed Insights report showed an issue related to contrast under accessibility.
I copied that message and used the prompt above in ChatGPT — and it provided easy-to-understand, step-by-step guidance that helped me fix it myself.
Scroll down for screenshots showing exactly how I did it!
I asked ChatGPT to help me using my prompt.
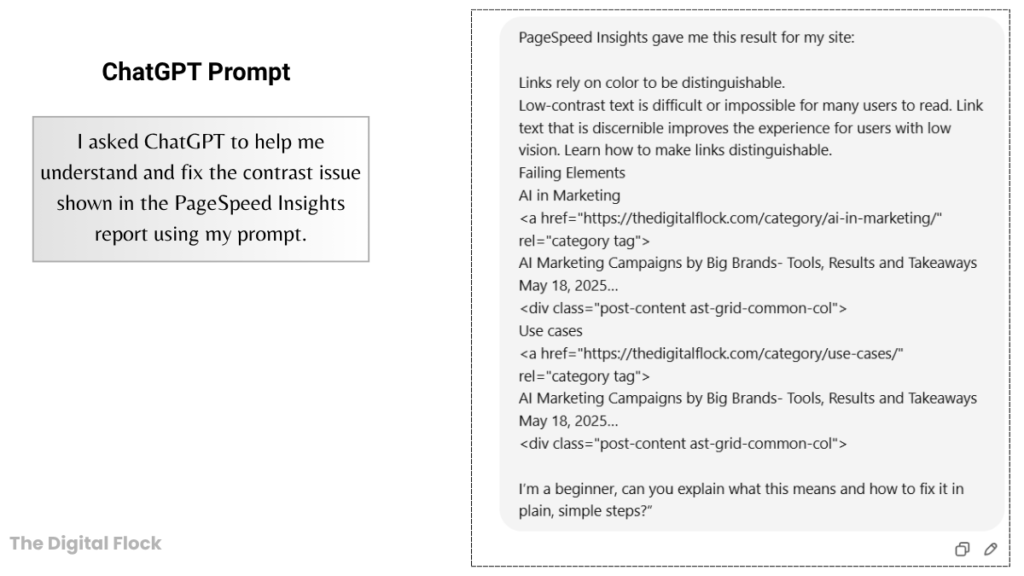
Below are the screenshots of ChatGPT’s response:
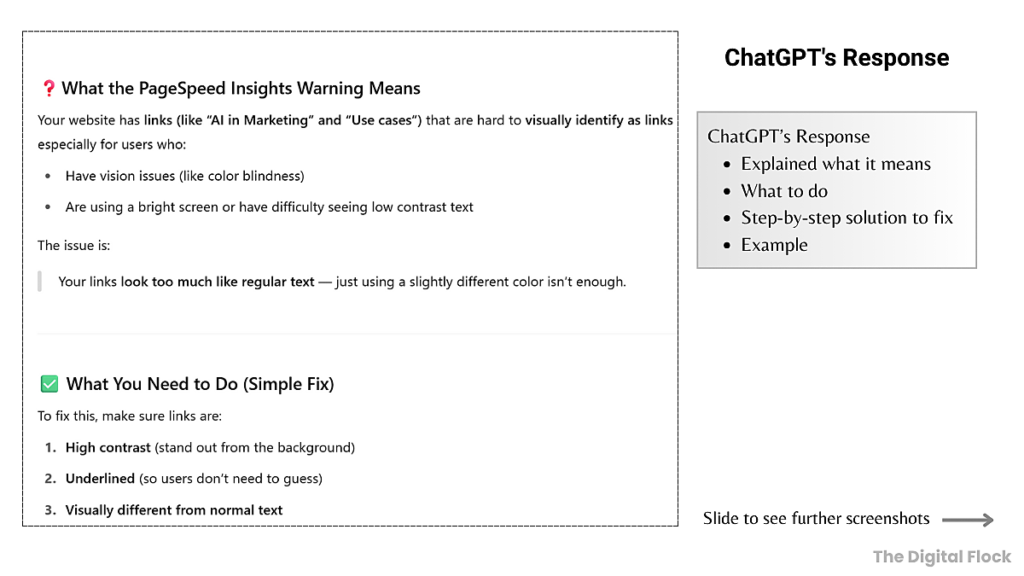
Thanks to ChatGPT, I understood and fixed the issue.
3. Core Web Vitals
In the previous section, we looked at mobile-friendliness and accessibility. Now let’s go a step deeper.
Core Web Vitals takes those ideas- speed, stability, and responsiveness and measures them using real user data.
It’s like, Google wants to know:
“Does your website load fast, respond quickly, and stay stable while loading?”
Google uses Core Web Vitals as key signals to rank your site and evaluate whether it delivers a smooth, enjoyable experience. That’s why they’re an essential part of any technical SEO checklist.
What Are the Core Web Vitals?
When you run your site through Page Speed Insights, you’ll see a Core Web Vitals assessment that summarizes your scores on these three metrics:
- LCP (Largest Contentful Paint)
What it checks: How fast your main content, like a big image or headline, loads on the screen.
Good score: Under 2.5 seconds - INP (Interaction to Next Paint)
What it measures: How fast your site responds when a user first interacts (like tapping a button)
Good score: Under 200 milliseconds - CLS (Cumulative Layout Shift)
What it measures: How much visible content shifts during loading (like buttons jumping)
Good score: Below 0.1
Beginner-Friendly Fixes for Core Web Vitals
Improving your Core Web Vitals means making your site faster, smoother, and more stable — especially for mobile users. Here are the most effective, beginner-friendly fixes:
- Compress Your Images:
Use smaller, optimized images in modern formats like WebP. This improves LCP by helping pages load faster. - Use a Lightweight Theme:
Avoid bulky page builders or heavy themes. Stick to clean, fast-loading themes that don’t overload your site with animations or unnecessary scripts.
I personally like the Astra theme- it’s lightweight and works great. - Minimize Unused CSS and JavaScript:
Too much unused code can slow down how your site loads or reacts. Remove any unnecessary scripts or styles, and keep only the plugins you need. This helps improve both LCP and INP - Prevent Layout Shifts:
Avoid elements jumping around while the page loads. Always define image dimensions and avoid late-loading content that pushes things around. This directly improves your CLS score. - Enable Lazy Loading:
Only load images when users scroll to them. By loading faster at the start, you can improve your LCP performance. - Use a Good Hosting Provider and CDN:
Fast servers and a content delivery network (CDN) help your site load quickly for users around the world, supporting all three Core Web Vitals.
Beginner Tip: Use AI to understand and fix Core Web Vitals scores
Core Web Vitals issues can sound intimidating. Terms like:
“Reduce LCP”
“Minimize main-thread work”
“Avoid large layout shifts.”
…can leave beginners confused.
But here’s what helped me:
Use the same trick I shared earlier. Copy the exact error from PageSpeed Insights, paste it into ChatGPT, and ask something like:
Prompt: “PageSpeed Insights gave me this result for my site: [paste issue]. I’m a beginner — can you explain what this means and how to fix it in simple steps?”
You’ll get a clear, step-by-step explanation of what’s wrong, why it matters, and how to fix it even if you have zero technical background.
You can also follow up with:
Do I need a plugin to fix this?
Can I solve this without hiring a developer?
Like in the Mobile Friendliness section, this method worked for me and made Core Web Vitals much easier to deal with.
Don’t See Core Web Vitals Data Yet?
If your site is brand new or has very low traffic, PageSpeed Insights might not show Core Web Vitals scores yet. That’s because Google needs real user data to generate them.
Don’t worry- just keep improving your speed, responsiveness, and mobile usability using the tips above.
As your traffic grows, this data will start showing up on its own.
How Core Web Vitals and Mobile Friendliness Work Together
Mobile Friendliness ensures your site works well on phones. Core Web Vitals measure speed and stability. They team up to improve your SEO and keep people happy on your site, and hence, are very important factors of the technical SEO checklist.
II. Website Security & Trust
4. Get an SSL Certificate
What’s an SSL Certificate?
It’s like giving your website a security stamp that says, ‘You’re safe here.’ It shows visitors (and Google) that your site is secure, so any info people enter, like passwords or payment details, is protected.
That extra ‘S’ in ‘HTTPS’? It stands for ‘Secure’ and helps protect your site.
Why SSL Certificate Matters:
- Protects personal and payment info
- Builds trust with visitors
- Helps improve your Google ranking
How to Know If a Website Has SSL
- Does your website address start with https://? It shows your website has SSL protection in place.
- Check the browser bar, you’ll see a padlock icon or a tune icon (on Chrome).
- Click it, and it’ll say something like “Connection is secure.”
How to Get an SSL Certificate:
These days, most hosts like Hostinger and Bluehost give you a free SSL certificate. Just check your hosting dashboard, it’s usually already active or can be turned on with one click.
If you’re using WordPress, a plugin like Really Simple SSL can help set things up, but in most cases, it’s not needed anymore, since almost all hosting providers include and enable SSL by default in 2025.
How to check if SSL Certificate is active:
Visit your site, if it shows https:// and a padlock (or a lock icon in Chrome), it’s working.
Checking this item off your technical SEO checklist is important to ensure the safety and security of your website.
III. Site Structure & Link Health
5. Structure and Format Your URLs
Imagine this:
www.thedigitalflock.com/ai-marketing-campaigns-by-big-brands/
www.example.com/7654hfgh4578?=abc123-p=182-pxvwyhl-rd243
Which one would you click?
Which one would Google understand better?
Keep these things in check for your URLs:
- Search engines understand hyphens as spaces between words in URLs, while underscores don’t provide that clarity.
- Keep them short and descriptive
- Limit to 2 folders max (e.g., /blog/technical-seo-checklist)
- Include your main keyword if it makes sense, but it’s highly recommended to use the keyword.
- Use lowercase letters only (it’s easier for Google to read and avoids confusion)
For example: www.thedigitalflock.com/ai-marketing-campaigns/ - Avoid URLs that are too long, messy, or filled with symbols. Both people and search engines find it easier to work with URLs that are neat and simple.
6. Fix Broken Links
What is a Broken Link?
A broken link is any link on your website that doesn’t work. It takes people to an error page like “page not found” 404 page, instead of where it’s supposed to go. This can lead to frustrated visitors and bad user experience.
It’s like giving someone directions to a shop that doesn’t exist anymore. Not helpful, right?
Examples of Links That Can Break and Stop Working:
- Internal Links: Internal links connect pages inside your website, like Read my blog on Types of AI in marketing.
Example: Let’s say I wrote a blog last month and linked to another post I had written earlier. But later, I deleted that old post, so now anyone clicking on that link will just hit a “404 Page Not Found.”
- External Links: Links that go to other websites.
Example: I had once linked to a favorite SEO tool on another site, but that page later got removed. When someone clicked it, they landed on an error page. Since then, I try to test my external links every few months just to be safe.
- Image or File Links: Links to images, PDFs, videos, or downloads.
Example: You linked to a PDF file, but later removed it from your site. Visitors clicking that link will hit an error.
How to Check if There Are Broken Links (Without Losing Your Mind)
No need to open every page and check links yourself- some tools do the hard work for you!
Simple Tools/ Plugins to Spot and Clean Up Broken Links:
- Broken Link Checker (Free plugin for WordPress) :
This one’s great if you’re on WordPress. It finds broken links on your site and shows them clearly in your dashboard. - Rank Math or Yoast SEO (Makes redirects easy):
These popular SEO plugins don’t directly scan for broken links, but they do notify you when a page goes missing or a URL changes.
Redirect old or broken links straight from WordPress with just a few clicks.
I personally like Rank Math’s Redirection Manager- it’s clean, fast, and gets the job done. - Ahrefs or SEMrush (Advanced, Paid Tools):
If you’re working on a larger site or want deeper reports, these tools offer full website audits, including broken link detection and much more.
My Tip:
Do a broken link check every month or two, especially if you’re updating content often.
Left unchecked, broken links can quietly pile up and signal to Google that your site isn’t well-maintained. That can hurt your SEO.
What to Do When You Find Broken Links (No Tech Skills Needed):
If the page still exists but the link is broken (maybe the URL changed or was copied wrong), go to your website editor and update the link to the correct one.
If the page is gone permanently, you can either remove the link or replace it with a working one that’s similar or useful.
Where to Find and Edit the Broken Link:
On most website platforms (WordPress, Wix, Webflow, Squarespace, etc.), you just:
- Log in to your website editor.
- Find the page or post that has the broken link.
- Click Edit, find the broken link in the text or button, and update or delete it
- Save or publish your changes.
If the page is gone for good, just remove the broken link or replace it with a similar, working link using the same steps above.
Fixing broken links and cleaning up your URLs are quick wins on your technical SEO checklist. They make it easier for search engines to crawl your site and help users navigate smoothly, both of which can boost your rankings over time.
IV. Crawlability and Indexing
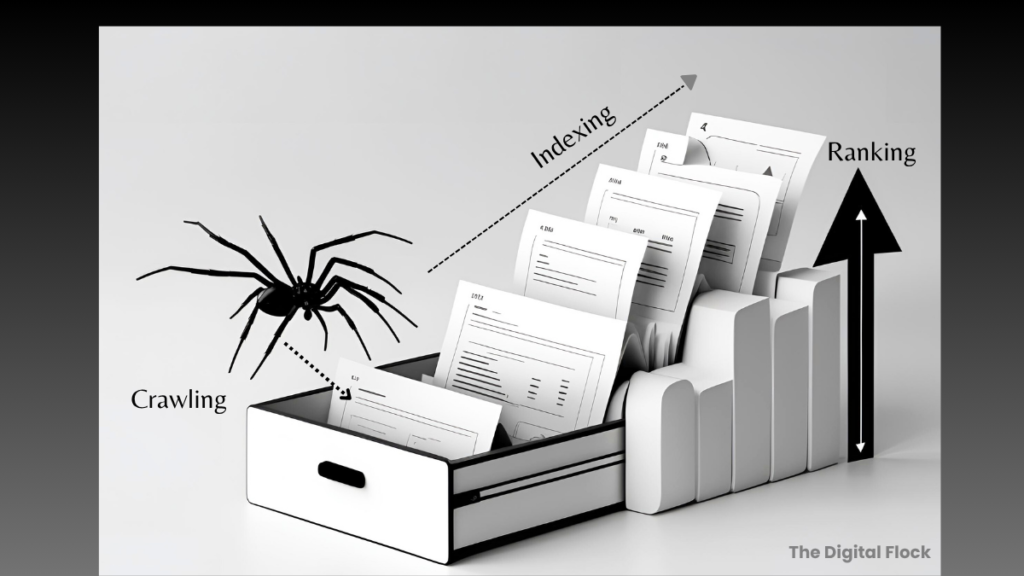
Search engines use bots (also called spiders) to crawl your site and discover pages. Next, they index the content by organizing and storing it in their database. Finally, they rank your pages based on many factors to decide where they appear in search results.
To help search engines crawl and index your site properly, make sure you’ve got these basics covered: sitemaps, robots.txt, and canonical tags.
Let’s break them down one by one:
7. Add an XML Sitemap
What is an XML Sitemap?
It’s like a simple map of your website for Google. It tells Google what pages your site has and when they were last updated, so it knows what to crawl and show in search results.
Why a sitemap matters for SEO:
It helps search engines discover your pages faster, especially new or recently updated ones.
Is Your Sitemap in Place? Here’s How to Check
In your browser, try visiting one of these URLs (replace yourwebsite.com with your actual domain):
https://yourwebsite.com/sitemap.xml
https://yourwebsite.com/sitemap_index.xml
https://yourwebsite.com/wp-sitemap.xml (common with WordPress and SEO plugins like Yoast or Rank Math)
https://yourwebsite.com/sitemap
If one of these opens a page with links to your site’s pages or blog posts, great, your sitemap exists.
If you see a 404 error, your sitemap may not be set up yet, or it could be hidden (like on some staging or private sites).
How Sitemaps Are Created:
No need to create one manually in most cases:
Platforms like WordPress, Shopify, or Wix usually automatically generate a sitemap for you.
If you’re using an SEO plugin (like Yoast, Rank Math, or All in One SEO), it likely handles the sitemap and keeps it updated as you publish content.
So, if you’re using any standard platform or plugin, your sitemap is probably already done.
What If You Don’t See a Sitemap?
It’s rare these days, but if your site doesn’t have one:
Check your SEO plugin or platform settings, sitemaps are usually just a toggle away.
Or try a free tool like XML-Sitemaps.com to create one manually.
How to Submit the Sitemap:
No matter how your sitemap is created, whether by your platform (like WordPress or Shopify), an SEO plugin, or a manual tool, you still need to submit it yourself in Google Search Console.
This step is mandatory if you want Google to know your sitemap exists and start indexing your pages properly.
- Go to Google Search Console
- Choose your site (you’ll need to verify ownership if you haven’t already)
- In the left menu, click “Sitemaps”
- Paste the sitemap URL, it might look like ‘sitemap.xml’ or ‘wp-sitemap.xml’
- Click Submit
Once submitted, you’ll see the sitemap’s status, last read date, and any crawl errors under that section.
8. Use a Robots.txt File
What is a Robots.txt File?
It’s a simple file that guides search bots on where they’re allowed to go on your site. It tells them which parts of your website they should or shouldn’t look at.
But wait, why would you not want Google to look at certain pages?
You might not want Google to list every single page on your website. Here are some examples:
- Thank you pages – appearing after a form is submitted. These aren’t useful in search results.
- You don’t want search engines picking up multiple copies of the same post, stick to one version
- Internal or admin pages – Login pages, dashboards, or backend tools shouldn’t appear in Google.
Blocking these kinds of pages helps search engines focus on the important stuff like your homepage, blog, or product pages instead of wasting time on the “meh” stuff.
So, in short:
A robots.txt file helps guide search engines to what matters and tells them to skip the rest.
How to Check if Your Site Has a Robots.txt File
Just go to:
https://yourwebsite.com/robots.txt
If a plain text page opens with a few lines of instructions, then your file exists.
If not, your site may not have one yet, and that’s okay; you can add one later if needed.
How Robots.txt Is Created
If you’re using WordPress, you already have a basic robots.txt file, even if you’ve never created one yourself.
Platforms like Hostinger, Wix, or Shopify also generate one automatically behind the scenes.
But here’s what’s helpful:
- If you’re using an SEO plugin like Yoast or Rank Math, they not only create the file for you, they also let you edit it easily from your WordPress dashboard.
- That’s super helpful if you want to block certain pages from being crawled (like admin or thank you pages).
Do we need to submit robots.txt?
No. Google will automatically detect your robots.txt file as long as it’s placed in your site’s root folder. Platforms and SEO plugins usually handle this for you, so you don’t have to do anything manually.
Double-check it’s working by visiting:
yourwebsite.com/robots.txt
That’s it. Nothing fancy.
9. Use Canonical Tags to Stop Content Duplication
Duplicate content on multiple pages can cause Google to get mixed signals about which page to show.
Example: Multiple URLs for the Same Page
Imagine you have a blog post accessible through two links:
www.example.com/blog/awesome-post
www.example.com/awesome-post
Both URLs lead to the same post, meaning the same content exists in multiple places. But Google may treat them as separate pages, which can create confusion about which page is the “real” or “original” version and which one to rank; this affects SEO.
How This Affects SEO:
- This can confuse Google as to which page to show or rank in search results.
- Traffic can drop if search engines get confused by duplicate content.
How Canonical Tags Help:
Canonical tags show Google which page you want to be seen as the original.
If two URLs show the same content, adding a canonical tag to one page helps Google know which one to prioritize in search results.
Do You Need to Add canonical tags Manually?
Usually, no. Most platforms like WordPress, Wix, and Shopify, along with SEO plugins like Yoast or Rank Math, automatically add canonical tags to your pages.
Just keep in mind:
- Stick to one main URL for your important content so Google doesn’t get confused.
- Avoid creating multiple pages with identical content.
- If you’re linking to the same page in different ways (e.g., with or without / at the end), use internal links consistently.
Together, your XML sitemap, robots.txt file, and canonical tags help search engines crawl, understand, and rank your site correctly. These elements are essential parts of any technical SEO checklist to make sure your content gets seen.
V. Enhanced Search Visibility
10. Use Structured Data (Schema Markup)
When you see stars, author info, or dates in Google results, that’s the magic of schema markup (also called structured data). It helps Google better understand your content and show useful info right in search results.
Common Types of Schema:
- Article Schema: With article schema, you’re telling Google, ‘Hey, this is a blog or article! It can display the author’s name, publish date, etc.
- Review Schema: This schema tells Google your content is a review, so it can show star ratings.
- FAQ Schema: If your post includes questions and answers, adding the FAQ schema helps those appear directly in Google’s search results.
How to Add Schema Markup:
If you’re using platforms like WordPress or Wix, etc., are most basic schema types like Article or Blog Posting are automatically added by SEO plugins like Rank Math or Yoast.
Why? Because WordPress knows your content type (e.g., blog post), and plugins like Rank Math detect that and apply the correct schema, usually Article, without you needing to set anything manually.
For example:
You publish a blog post, WordPress knows it’s a “post,” then Rank Math adds Article schema by default.
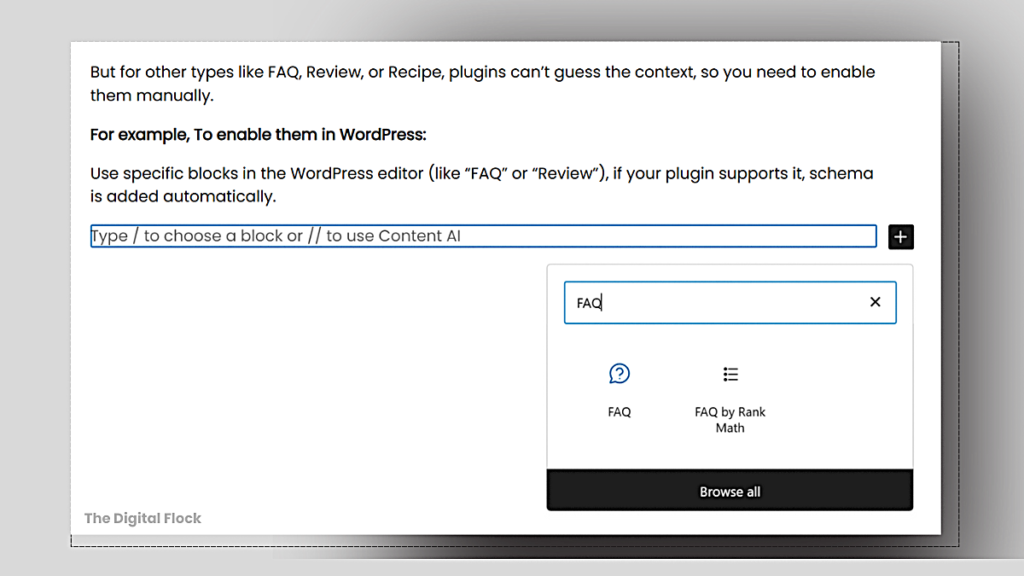
But for other types like FAQ, Review, or Recipe, plugins can’t guess the context, so you need to enable them manually.
Personal example:
For my author page, I’ve used the “person” schema type, which tells Google that this page is about a person, not an article, FAQ or review.
To enable them in WordPress:
Use specific blocks in the WordPress editor (like “FAQ” or “Review”), if your plugin supports it, schema is added automatically.
Or, open your SEO plugin’s schema options (e.g., Rank Math’s Schema Generator), choose the schema type, and fill in the content.
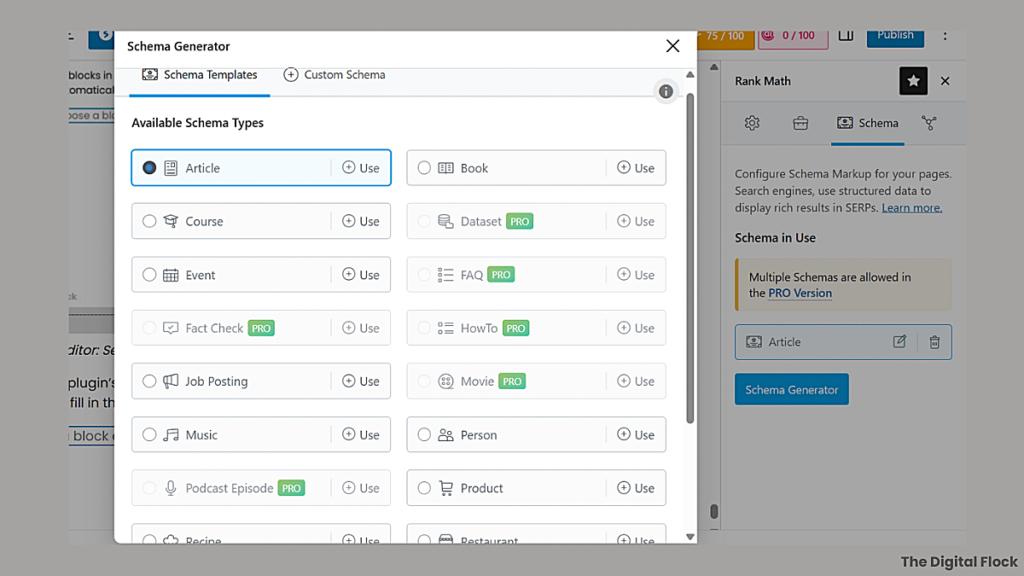
Some plugins also offer pre-made schema templates for How-To, Event, and more – just select and customize them.
If you’re using a different website builder or a custom-coded site, you can manually create schema using tools like Google’s Structured Data Markup Helper or Schema.org generators. This isn’t required for most users, but it’s useful if you need something custom.
Once added, you can test it using Google’s Rich Results Test tool.
Structured data doesn’t just help traditional search results, it also helps AI systems understand what your content represents. As AI-generated answers and AI Overviews rely on clear context and structured information, strong technical foundations like schema directly support AI visibility.
If you want to go deeper into how content gets reused and cited inside AI systems, I’ve explained the SEO strategies for AI visibility tools in detail, including how I structure and write content for AI-first search.
Final Thoughts on Technical SEO Checklist:
The goal of this technical SEO checklist isn’t to master every item, but to understand the basics well enough to keep your site clean, fast, and Google-friendly.
You don’t have to be a developer. You just need to know what to check and communicate smartly with your tech team or developer.
If you’re a digital marketer, blogger, or small business owner, ticking off each item of this Technical SEO checklist will help you fix the behind-the-scenes issues that could be holding your website back from ranking well.
About the Author
AI marketing strategist & founder of The Digital Flock, specializing in AI tools, AI SEO, and content automation. She applies AI in real marketing workflows and documents the results through strategies, tutorials, and case studies to help marketers use AI practically.